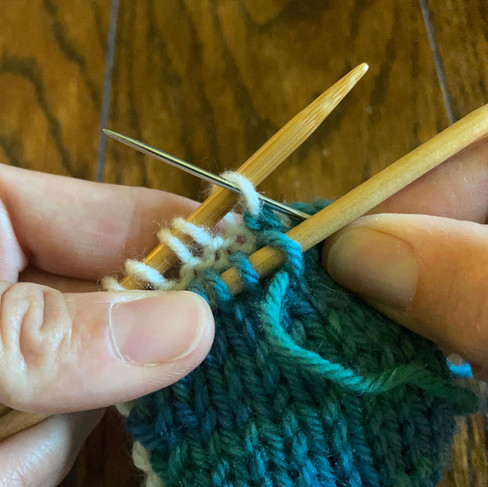
Invisible Cast-On and Bind-Off Tutorial for Double Knitting
- theknottingway
- Sep 6, 2021
- 3 min read
Updated: Nov 21, 2024
After exploring double knitting in May, I can't wait to design something new for the fall! In this new project, I want the edges to be stretchy and blend in with the piece, rather than give them a defined look. However, the Two-Color Cast-on and the One-Color Cast-on, described in May's post, created a distinct edge. I knew there had to be other ways to cast-on and bind-off in double knitting, so I did some research and found a few great ideas. I decided to go with the Invisible Cast-on for Double Knitting and the Invisible Bind-off for Double Knitting. They are perfect! They provide just the right combination of stretchiness and invisibility that I am looking for in my next project.

Invisible Cast-On for Double Knitting
The invisible cast-on for double knitting is similar to the Long Tail Cast-On, but it is worked using both strands of yarn instead of the tail.

Set up: Hold both strands of yarn together and make a slip knot. The slip knot does not count as your first stitch pair and it will be removed later. Begin by making a v shape with your index finger and thumb. Next, wrap one strand of yarn around your index finger, moving the yarn from the inside of the v to the outside. Securely hold the yarn tail in the palm of your hand. Then take the other strand of yarn and wrap it around your thumb, moving the yarn from the inside of the v to the outside. Securely hold this yarn in your palm also. You are now ready to cast on.
Step 1: With your needle, go under the yarn leading from your thumb to the slip knot (picture below on left). Then, from above, grab the yarn leading from your index finger to the slip knot (picture below on right). Pull the yarn through and tighten the stitch on your needle by slightly widening your thumb and index finger. You now have one stitch on your needle.
Step 2: With your needle, go below the yarn leading from your index finger to the slip knot (picture below left). Then grab the yarn leading from your thumb to the slip knot from above (picture below middle). Pull the yarn through and tighten the stitch on your needle by slightly widening your thumb and index finger. You now have two stitches on your needles, one in each color. This is one stitch pair (picture below right).
Repeat Steps 1-2 until you have the correct number of stitch pairs for your pattern. Click here for a video demonstration.
Invisible Bind-Off for Double Knitting
The invisible bind-off for double knitting is similar to Kitchener Stitch. Because double knitting essentially creates two separate fabrics, a grafting technique, such as Kitchener Stitch, can be used to graft together and secure the live stitches on both fabrics. In this case, it creates a bind-off edge.

To perform this bind-off method, two similar-sized needles and a tapestry needle are required. Circular needles are helpful but are not strictly necessary.
Set up: Slip stitches, one at a time, onto needles, separating by color. Then purl one round on the back needles only. Using the front color, cut a long tail about four times as long as the project and thread it onto the tapestry needle. Now you are ready to begin working Kitchener Stitch.
Step 1: Holding your knitting needles parallel, pull the tapestry needle through the first stitch on the front needle as if to purl. Leave the stitch on the knitting needle (picture below on left).
Step 2: Pull the tapestry needle through the first stitch on the back needle as if to knit. Leave the stitch on the knitting needle (picture below on right).
Step 3: Pull the tapestry needle through the first stitch on the front needle as if to knit and remove it from the knitting needle (picture below on left).
Step 4: Pull the tapestry needle through the next stitch on the front needle as if to purl and leave the stitch on the knitting needle (picture below on right).
Step 5: Pull the tapestry needle through the first stitch on the back needle as if to purl and remove it from the knitting needle (picture below on left).
Step 6: Pull the tapestry needle through the next stitch on the back needle as if to knit and leave the stitch on the knitting needle (picture below on right).
Rep steps 3-6 until one stitch remains on each knitting needle. Then repeat steps 3 and 5. Secure ends. Click here for a video demonstration.
Subscribe to my mailing list to learn more knitting tips like this one, find out about pattern releases, and receive exclusive discounts and coupons.


